DIY | Polymer Clay Heart Earrings :: Gifts for Her

Friday, January 8, 2016

Many years back I got into making jewelry, anything from beads to polymer clay. In keeping with my holiday spirit and celebrating Valentine's Day (over a month early hehe), I decided to make these super cute polymer clay heart earrings with a touch of pearl. You can watch the video here


Supplies:

  • Polymer clay
  • Heart shaped mini metal cutter
  • Gesso (unless you have colored polymer clay)
  • Acrylic paint (unless you have colored polymer clay)
  • Sculpey Gloss Glaze
  • Glossy Accents
  • Flat back pearls of various sizes
  • Stainless steel earring posts
  • Hot glue

I should mention, and maybe this will be a tip for others, that the polymer clay I had was from several years back. Needless to say it was kind of dry. I ended up putting the piece of polymer clay I wanted to work with in a ziplock bag, and then I placed that bag into a bowl of hot water and let it sit for about 30 minutes. It softened up the clay enough to work with!

Roll out your clay!


Next I took the heart shaped metal cutter and cut out a couple of hearts. As you can see it was a little off on the lower right side, so I just took my X-acto knife to even it out a bit. 


Then I popped these girls in the oven at 275° F for 15 minutes.


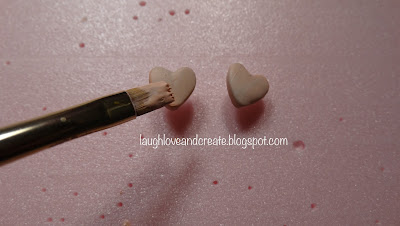
Before I painted, I hot glued the stainless steel posts to the hearts. 


I first applied Gesso as a base, and then 2 layers of paint. Again if you have colored clay, you can skip this part. I'm just too frugal to go out and buy colored clay. hehe.


This is my favorite product, Sculpey gloss glaze. I applied 2 layers of this as well, waiting 30mins between each layer. This glaze is just amazing. It adds a beautiful glaze and it fills in any imperfections. 


And I don't know what happened with the lighting, so forgive me, but lastly I applied these flat back pearls. I used Glossy Accents to bond the pearls to the hearts. 


And there you have it! Cute heart earrings. You can switch up the colors and the bling. 


DIY | Valentine Bookmarks!

Thursday, January 7, 2016


First of all, I love a good book. I would love to receive some cute handmade bookmarks. These Valentine's themed bookmarks are super cute for the book lovers in your life! And it's really easy to make. Here I show a video tutorial on how to make one of these bookmarks, but I have faith you will be able to go off on your own and use your own creativity to make some originals. You just need some inspiration.

Pink Heart with Pearls Bookmark

Supplies:

  • Markers or colored pencils
  • Ribbon
  • Card stock
  • Flat back pearls
  • Corner punch

Directions:

Cut out a piece of card stock 4 x 5.5". Then at the 2" mark, score the paper to make a fold. 


I used a Cuttlebug embossing folder to make this heart. If you don't have a Cuttlebug or this particular embossing folder, you can always just free hand this heart or any heart of your choice. 


A little bit of Aleene's Tacky Line Runner will close up this bookmark.


Then you want to round out the corners (if you want to :))


I then colored in the heart with my Copic markers; colors RV02 and RV04. Any marker or colored        pencil will do. 


I decided to accent the embossed dots and placed some flat back pearls. I used Glossy Accents to adhere the pearls to the bookmark. Totally optional. Some may not want too much bulk to their bookmarks. 


Lastly you just want to punch a hole at the top and add some ribbon!


Purple and Pink Rose Heart Bookmark

Supplies:

  • Markers or colored pencils
  • Ribbon
  • Card stock
  • Heart Stickers
  • Corner Punch

Directions:

This one is even simpler. I just used some cardstock, used the same measurements, corner punch, Copic marker BV08, and added some purple ribbon at the end.


I was trying to stamp the word "Love" on the bookmark. Unfortunately the "E" was offset. So it didn't come out as I wanted. Instead of wasting the bookmark, I decided to color in with a purple heart. I then used this sticker heart in the center.


And there you have it!! A few bookmark ideas to get you started for that loved one on Valentine's day, or any day of the year!! Can't go wrong with a bookmark!

DIY | Valentine Heart Tree

As a continuation to my DIY Valentine Mason Jars, I have added a video on how to make a Valentine Heart Tree. Very simple and cost close to nothing. Most items bought at the Dollar Store and the branches were found right outside in my backyard! Click here to watch the video!


Supplies:

  • Branches
  • Liquitex Gesso
  • Sculpey Gloss Glaze
  • Eva Stickers; 100 hearts from the Dollar Store
  • Elmer's School Glue
  • Studio g extra fine glitter; pack of three - from AC Moore
  • Sew Easy baker's twine from Michael's Craft Store

DIY | Valentine Mason Jars

Valentine's is just around the corner and because I've been in such high holiday spirits I thought why stop after Christmas and New Years? So I have gone on to decorate for Valentine's Day. 

 Now the hubby and I don't particularly celebrate Valentine's day, in fact it's unlikely that we will even exchange gifts on this day, but that doesn't mean you can't decorate for the occasion. 

 I will have a series of videos coming out within the next month catered to all those who love to celebrate love.

This particular video is part of a two part series actually. This first one will go through the steps to decorating a few mason jars to make them into a vase or candle holders. You can watch that video here. Most of the supplies I used to make this are either from the Dollar Store or I had laying around the house. 


Supplies: 
  • Liquitex acrylic paint; Basics line; in colors Light Portrait Pink and Quinacridone Magenta
  • Floral Garden Lace Ribbon (heart ribbon had no specific name except "ribbon") - both from the Dollar Store
  • Mason Jars
  • Studio g extra fine glitter; pack of three - from AC Moore
  • Sculpey Gloss Glaze
  • Eva Stickers; 100 hearts from the Dollar Store
  • Elmer's School Glue
  • Studio g extra fine glitter; pack of three - from AC Moore
Stay tuned for part two in which I go through how to make a Valentine's heart tree to go along with the mason jar. 

Happy New Year!

Friday, January 1, 2016


I can't believe it's already 2016. I remember when it was 1999. I was 14 years old and for some not so bright reason my mother decided it would be a great idea to go food shopping on New Years eve. Yeah, that didn't go over too well. We were in the check-out line for well over an hour. Everyone was stocking up on batteries, gallons of water, and canned goods. Do you remember Y2K? Everyone thought the world was coming to an end. Luckily for us it didn't. But it seemed like just yesterday I was that 14-year-old girl wondering why the grocery store was so packed with people! 16 years later and so much has happened. Most of which I don't remember (I have the memory of a 90 year old, not because I'm a boozer).

2015 has been an amazing year for me. I got married to the love of my life, got accepted into the nursing program, and bought my first car! (yes at my age). And currently my husband and I are in the process of purchasing our very own house. I can't even imagine what will be in store for 2016. 

Cheers to 2016!
 
template design by Studio Mommy (© copyright 2015)