Showing posts with label celebrate. Show all posts

Working with Watercolors || Valentine's Day Greeting Cards

Saturday, February 4, 2017

After making the birthday card for my mother using watercolor paints, I decided to continue to practice. I was happy with the end result, but I wasn't happy with the process, and a lot of that had to do with the fact that I just don't have enough or any experience with watercolor paints. In this post I'm going to present 3 more greeting cards that I made using watercolors. As I went on, you can see that my technique has indeed gotten better. Albeit I'm not an expert, but I definitely see some improvement.

I've been having so much fun using watercolor paints. It has opened up a new world for me. It has sparked some new creative ideas and I can't seem to stay out of my art room!

Here is the first card that I made for Valentine's Day:


As you can see the red and purple are very dark. I hadn't yet achieved the skill working with water. I still liked the way it turned out, but as I continue on, you can see that I get a little better with blending the colors.

To create this card I used the following products:
*Reeves 24-Pack Water Color Paint Set: http://amzn.to/2jOFktf
*Aleene’s Quicky Dry Tacky Glue: http://amzn.to/2iwGk4b
*Watercolor Paint Brushes: http://amzn.to/2jn2Pgu
*DCWV Glitter Cardstock 12 X 12” (closest I could find): http://amzn.to/2jVkgW7 
*Sequins: http://amzn.to/2kd1I0x
*Elmer's Dot Runner: http://amzn.to/2knKss4

You can also check out my video here.

The next card I created for Valentine's Day, I wanted to deviate from the traditional colors of red, pink, and white. And I used sequins. Lots of sequins. Now looking back, maybe too many sequins.


Again, a little heavy handed with the watercolor paints, but I had hope and continued on with my quest!

To create this card I used the following products:
*Reeves 24-Pack Water Color Paint Set: http://amzn.to/2jOFktf
*Aleene’s Quicky Dry Tacky Glue: http://amzn.to/2iwGk4b
*Watercolor Paint Brushes: http://amzn.to/2jn2Pgu
*Sequins: http://amzn.to/2kd1I0x
*Elmer's Dot Runner: http://amzn.to/2knKss4

You can also check out my video here.

Lastly I made this gem. Sorry for tooting my own horn, but I am in love with this card. I again deviated from the traditional Valentine's Day colors with these warm yellows and oranges. I was inspired by a vintage Valentine's Day card that I saw on Pinterest. I wanted to recreate it, but with my own twist. I also didn't have any specialized tools or stamps to work with. Everything was drawn out by hand. I am so proud of this card and the work I put into it. And glitter. As you could probably tell, I love shiny objects like glitter. I didn't go so overboard, though, as I did with the sequins in the previous card. This is what I came up with:


As you can see, the colors blended nicely and I think that has a lot to do with me getting a bit better with watercolor painting, and allowing water to be my friend not my enemy.

To create this card I used the following products:
*Strathmore STR-361-9 Watercolor Class (24 Pack), 9 by 12": http://amzn.to/2l8Tx51
*Artists Loft Fundamentals Watercolor Pan Set, 36 Colors: http://amzn.to/2l94gfB
*Heartybay 10Pieces Round Pointed Tip Nylon Hair Brush Set, Blue: http://amzn.to/2l97cIW
*JAM Paper Corner Punches - Rounded Corners: http://amzn.to/2l93FL3
*Copic Markers 9-Piece Multiliner Inking Pen Set B-2, Black (MLB2): http://amzn.to/2l97OhI
*Recollections Signature Glitter Caddy, Iridescent Shapes: https://www.michaels.com/recollection...
*Ranger Inkssentials Glossy Accents Precision Tip, 2-Ounce: http://amzn.to/2l8V6Qr
*DCWV Cardstock Stack, Match Makers Brights, 58 Sheets, 12 x 12 inches: http://amzn.to/2kEa57Q
*Aleene's Tacky Dot Roll-Small Dot Roll: http://amzn.to/2k7FZqc
*Scrapbook Adhesives 3D Foam Squares: http://amzn.to/2k821cv

You can also check out my video here.

In the end, all that matters is the fun and love you put into your projects. I hope this gives motivation to others who feel they're not good with art. I was having a conversation the other day with a friend of mine who is taking an art class. She keeps sending me pictures of her projects/homework assignments and ending the message with, "I'm horrible!". I honestly thought she was doing a great job. There were some tips I offered, but I reminded her that some people are naturally gifted in the arts, while others have to practice. I'm one of those ones who need practice. So if you're ever thinking you can't paint, draw, etc., just remember practice makes perfect. And in all honesty, is art ever perfect?


DIY | Polymer Clay Heart Earrings :: Gifts for Her

Friday, January 8, 2016

Many years back I got into making jewelry, anything from beads to polymer clay. In keeping with my holiday spirit and celebrating Valentine's Day (over a month early hehe), I decided to make these super cute polymer clay heart earrings with a touch of pearl. You can watch the video here


Supplies:

  • Polymer clay
  • Heart shaped mini metal cutter
  • Gesso (unless you have colored polymer clay)
  • Acrylic paint (unless you have colored polymer clay)
  • Sculpey Gloss Glaze
  • Glossy Accents
  • Flat back pearls of various sizes
  • Stainless steel earring posts
  • Hot glue

I should mention, and maybe this will be a tip for others, that the polymer clay I had was from several years back. Needless to say it was kind of dry. I ended up putting the piece of polymer clay I wanted to work with in a ziplock bag, and then I placed that bag into a bowl of hot water and let it sit for about 30 minutes. It softened up the clay enough to work with!

Roll out your clay!


Next I took the heart shaped metal cutter and cut out a couple of hearts. As you can see it was a little off on the lower right side, so I just took my X-acto knife to even it out a bit. 


Then I popped these girls in the oven at 275° F for 15 minutes.


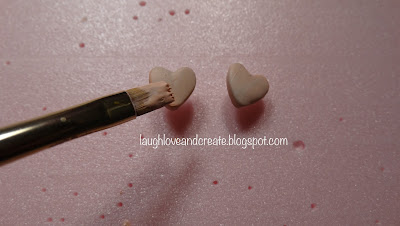
Before I painted, I hot glued the stainless steel posts to the hearts. 


I first applied Gesso as a base, and then 2 layers of paint. Again if you have colored clay, you can skip this part. I'm just too frugal to go out and buy colored clay. hehe.


This is my favorite product, Sculpey gloss glaze. I applied 2 layers of this as well, waiting 30mins between each layer. This glaze is just amazing. It adds a beautiful glaze and it fills in any imperfections. 


And I don't know what happened with the lighting, so forgive me, but lastly I applied these flat back pearls. I used Glossy Accents to bond the pearls to the hearts. 


And there you have it! Cute heart earrings. You can switch up the colors and the bling. 


DIY | Valentine Heart Tree

Thursday, January 7, 2016

As a continuation to my DIY Valentine Mason Jars, I have added a video on how to make a Valentine Heart Tree. Very simple and cost close to nothing. Most items bought at the Dollar Store and the branches were found right outside in my backyard! Click here to watch the video!


Supplies:

  • Branches
  • Liquitex Gesso
  • Sculpey Gloss Glaze
  • Eva Stickers; 100 hearts from the Dollar Store
  • Elmer's School Glue
  • Studio g extra fine glitter; pack of three - from AC Moore
  • Sew Easy baker's twine from Michael's Craft Store

DIY | Valentine Mason Jars

Valentine's is just around the corner and because I've been in such high holiday spirits I thought why stop after Christmas and New Years? So I have gone on to decorate for Valentine's Day. 

 Now the hubby and I don't particularly celebrate Valentine's day, in fact it's unlikely that we will even exchange gifts on this day, but that doesn't mean you can't decorate for the occasion. 

 I will have a series of videos coming out within the next month catered to all those who love to celebrate love.

This particular video is part of a two part series actually. This first one will go through the steps to decorating a few mason jars to make them into a vase or candle holders. You can watch that video here. Most of the supplies I used to make this are either from the Dollar Store or I had laying around the house. 


Supplies: 
  • Liquitex acrylic paint; Basics line; in colors Light Portrait Pink and Quinacridone Magenta
  • Floral Garden Lace Ribbon (heart ribbon had no specific name except "ribbon") - both from the Dollar Store
  • Mason Jars
  • Studio g extra fine glitter; pack of three - from AC Moore
  • Sculpey Gloss Glaze
  • Eva Stickers; 100 hearts from the Dollar Store
  • Elmer's School Glue
  • Studio g extra fine glitter; pack of three - from AC Moore
Stay tuned for part two in which I go through how to make a Valentine's heart tree to go along with the mason jar. 

 
template design by Studio Mommy (© copyright 2015)